
Window Repair Made Easy
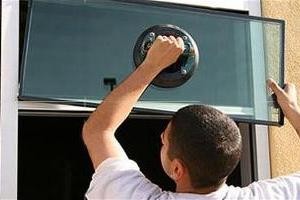
Window repair is an easy job for a homeowner of any level. You'll require some supplies and tools that can be found at most home centers or hardware shops.
Before you begin any work, wear eye protection and gloves to prevent being cut by glass shards that have broken. You'll need to take out any glazing pins (metal pieces with pointed edges that are pushed into frames) that hold the pane in position.
How do fix a cracked window
There aren't many things more than a source of anxiety when it comes to the maintenance of your home than finding a cracked window. This kind of damage can allow pests and air to enter your home. It also weakens and damages the window pane, which can lead to further cracking.
Fortunately, window repair for cracks is a simple task by using home remedies and tools. The key is to take action prior to the crack gets worse.
upvc window repair start small, but develop as time passes. This is particularly when they are subjected to extreme temperatures or rough treatment. It's important to know that there are many different kinds of cracks in glass, each with its own causes and solutions.
Cracks caused by thermal stress can be caused by the continuous expansion of glass in doors or windows that are closed and opened often, or in locations where temperatures vary. These cracks tend to appear on the edges of windows and then progress towards the center over time.
Other kinds of cracks in window glass are known as impact cracks. They can be caused by anything from a pebble or golf ball hitting the glass to sudden pressure. These kinds of cracks tend to have the appearance of spider webs and can be quite difficult to detect or avoid.
Although it's not the most visually appealing solution, one of the easiest ways to fix a cracked window is to cover it with tape. This will keep the crack from spreading and seal the area, which is a great temporary fix until you have more permanent solutions available.
Glass adhesive is another option. It is specifically designed for automotive windows, but it works equally well on household windows. You can find this type of sealant on the internet or in most auto maintenance stores.
Follow the directions on the packaging to mix the two components of the adhesive together, then apply it to the damaged glass and press it down. Once the sealant dries it should stop the crack from spreading further and can be removed easily by using a razor. If the crack is too large for this method, it is likely that the window will have to be replaced.
Applying Masking Tape
Applying masking tape to surfaces before painting is a basic step in any project. It is essential to mask off the area you want to paint, whether that's interior or exterior windows, walls, or trim. This will help prevent spraying over or a mess. Masking isn't only for big jobs. It can be used to protect furniture and carpets against paint spatter and drips from rollers.
You can purchase pre-taped masking film from some hardware stores, which makes the process much simpler than placing strips of tape or paper. This product comes with an adhesive strip that is similar to regular painter's tape that runs along one edge and is firmly attached to any object you do not want painted, such as window frames and glass.
Be sure to thoroughly clean the walls and moldings prior to beginning any kind of masking. This will remove any dirt, dust and other debris. This could make it difficult for the adhesive to stick well, so it's essential to ensure that you complete the task correctly.
You'll require different thicknesses based on the task. The thicker tapes are great for precise work or high-end finishes because they have a higher degree of adhesion. Thinner tapes are less adhesive however, they can be used for a wider range of applications.
Be sure to apply tapes straight and firmly. This ensures a neat finish when you're finished. It's important to make sure that any gaps or poorly stuck-down areas are cleaned up before proceeding.
If you're not comfortable using tape or would prefer to make the process as easy as possible, consider getting an applicator for painter's tape. It comes with a built-in cutter and dispenser, making it a convenient way to line up the tape quickly and precisely on the ceiling or wall.
It's also a good idea to use a non-flammable, silicone masking tape that is not stick. This type of tape is available at many hardware stores and comes with high resistance to temperature. The silicone ensures that it won't break or break off during use and is also less susceptible to damage when applied to fragile surfaces like glass or wood.
Applying Super Glue
Super glue, also referred to as cyanoacrylate adhesives, are an excellent choice to repair glass. These instant adhesives form a crystal-clear seal that can be able to withstand heavy loads and shock. These adhesives can be used for a variety substrates, including metal, wood and ceramics. They are available in both gel and liquid formulas. Liquids are best suited to breaking through fractures or cracks and generally dry quicker than gels.
The substrate as well as the environmental conditions will determine the type of superglue you require. For example, you will prefer the super glue for glass that has been created with the same index of refraction as the glass and ensures that the seal is not visible. A special super glue designed for glass also has a greater bond strength than conventional cyanoacrylate adhesives and can withstand high temperatures.
The temperature in which you work will also have an impact on the time it takes for the super glue to attain initial adhesion. A room that is hotter will increase the viscosity (or thickness) of super glue, whereas the lower temperature will reduce it. This is not related to the chemistry of the glue, but is a crucial factor to keep in mind, especially when working outdoors or indoors where humidity levels can change drastically.
Super glue is toxic and can cause severe burns on the skin. This is why it is always best to wear gloves and ensure that your workspace is well-ventilated. Hairdryers can be used to accelerate the drying process of super glue, however it is crucial that you keep it at a low heat setting. You can also open windows and ventilators to improve circulation in your work area, which will aid in the speedy drying of glue and stop you from breathing in any harmful fumes.
Consider a superglue with brush application if your project requires precise application and a quick time to set. Loctite Super Glue Liquid Brush On is an item that comes with an applicator for brushes. This allows you to control how much adhesive is applied. It's ideal for projects that require precision or vertical application. This liquid super glue is suitable for a variety of substrates, is resistant to heat and shock up to 120degC and is dishwasher safe.
Applying Epoxy
Epoxy can be used to make permanent repairs to rotting window sills. It is an excellent choice for replacing exterior moldings, door jambs, and other things that are difficult to replace. It is also simple to handle and can be shaped, carved and sanded in the same manner as wood. It is very durable and can endure the elements without cracking or breaking. It is also stain-resistant and can be painted to match the naked wood.
It is best to have professional help from an established repair and painting service when working with epoxy. This will help ensure the work is completed correctly and in accordance with the specifications. They will also be able to apply the epoxy floor coating using the right tools and the proper application procedure.
If you're doing the work yourself, make sure to go through the instructions from the manufacturer. You will learn the right ratio between part A and part B epoxy as well as the temperature range that is the most suitable for the product. If you apply the epoxy under unfavorable conditions, it may not cure properly or can even bubble or peel.
Wait 10 to 24 hours after the initial coat of epoxy is applied before applying the second coat. This time can differ by brand. Always check with the manufacturer to ensure you are giving the product the time it needs to achieve a satisfactory outcome.
During this time, you will need to protect the work area from rain and wind. If you can, put a loose-fitting tent on the surface to keep it clean and dry while you wait for it to dry. This is crucial if you plan to apply multiple coats of epoxy.
After the first coat is cured and dried, add color flakes into the epoxy. The flakes are available in an array of colors, and can be mixed with the epoxy to create a unique visual effect. It is a good idea to work in small pieces when applying the flakes, because you'll have less time to roll the epoxy over itself as you go. If you've got some leftover epoxy after putting on the flakes, you can scrape it away using a putty knife, drywall tape, or an old dustpan, and then put it back into the mixing container to be used on another section.